QuantLib Installation in VC++ 2008
Dimitri Reiswich
These are step-by-step instructions to install QuantLib on the Microsoft Visual C++ 2008 IDE (the free Express version can be downloaded at http://www.microsoft.com/express/vc/.) I tried to include almost every step in the installation procedure. Something that is obvious to one person might not be obvious to someone else. The only thing that I assume that you have on your computer is the Visual C++ 2008 IDE.
These instructions should also work for Visual C++ 2005.
Before using QuantLib you need to install the Boost library on your computer. Detailed instructions follow in the next section. There are two options to install Boost. The first one (the fastest) is to download an installer, which in turn downloads and extracts pre-built libraries. The second option is that you build the Boost libraries. This takes more time than the first option; installation instructions are provided in the Appendix.
Boost Installation
I suggest to use the binary installer provided by the Boost project, that can be downloaded at http://sourceforge.net/projects/boost/files/boost-binaries/.
You'll have to enter the folder corresponding to the release you want to download (at the time of this writing, the latest version is Boost 1.55.0) and then choose the installer corresponding to your compiler and platform; for instance, boost_1_55_0-msvc-9.0-64.exe for Visual C++ 9 on a 64-bit system. Download and run the installer. The rest of this tutorial was written a while ago and assumes that you installed Boost 1.39 into the C:\Boost\boost_1_39 folder; replace that with whatever folder the installer creates for your newer version (for instance, C:\Boost\boost_1_55_0).
Boost Configuration
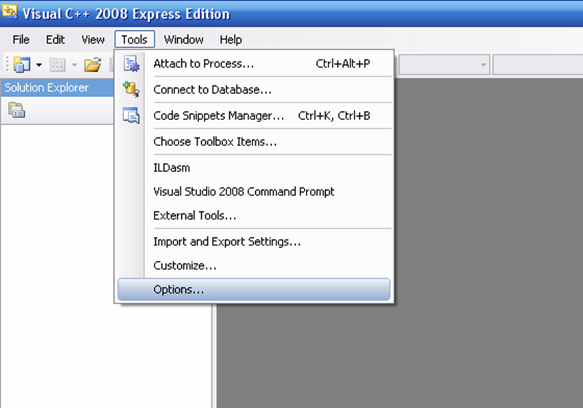
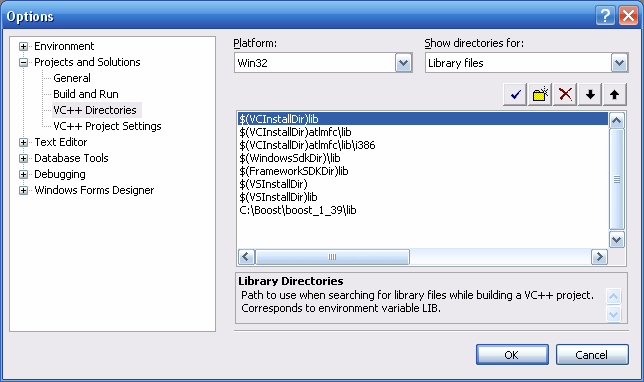
Before proceeding, we will make the Boost headers and libraries available to all C++ projects. This allows us to make changes in only one place after updating Boost. To do this, open Visual Studio without a project and go to Tools/Options in the upper menu.
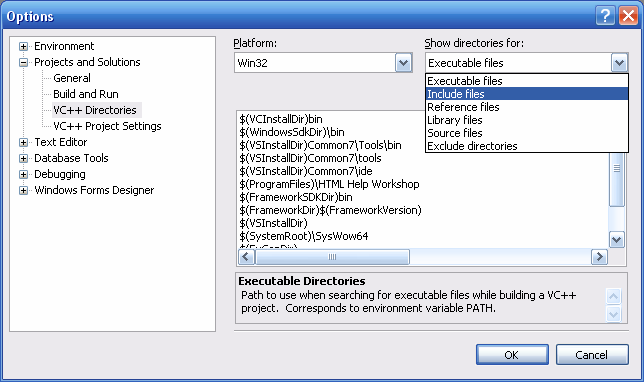
Go to Projects and Solutions/VC++ Directories in the left-side tree, and choose Include files in the Show directories for: drop-down menu on the upper right.
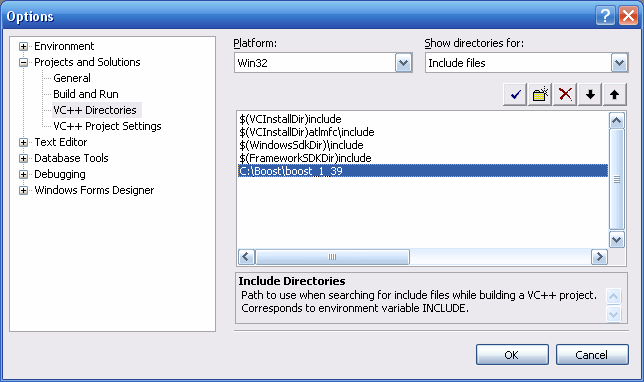
Include the Boost folder, in our case C:\Boost\boost_1_39.
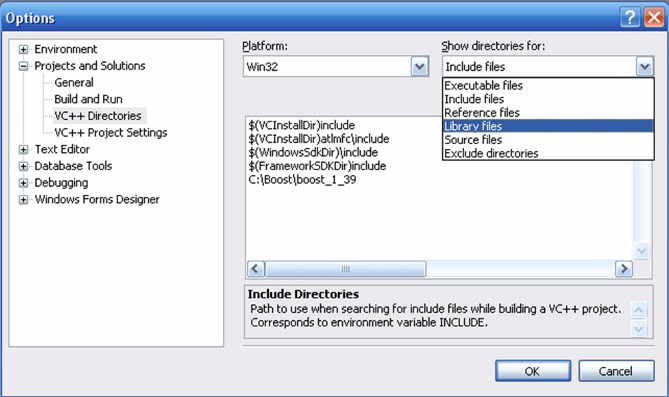
Go again to the Show directories for: drop-down menu and choose Library files.
Include the Boost library folder. In earlier Boost versions, as in our case, it was called C:\Boost\boost_1_39\lib. In later versions, the folder has a name such as C:\Boost\boost_1_63_0\lib32-msvc-9.0 or C:\Boost\boost_1_63_0\lib64-msvc-9.0 which includes compiler and build information; if you installed multiple ones, choose the one corresponding to your configuration. Click OK. You're done. In case you run into problems afterwards, the Appendix shows how to build a test program to check that Boost is correctly installed.
QuantLib Installation
If you haven't downloaded QuantLib yet, go to its release page, located at https://github.com/lballabio/QuantLib/releases. Find the latest version (at the time of this writing, 0.9.7; this will have changed when you read this) and download the zip archive to your local drive. Create a C:\QuantLib folder (or any folder you want) and unzip the file in there, which will result in a C:\QuantLib\QuantLib-0.9.7 folder.
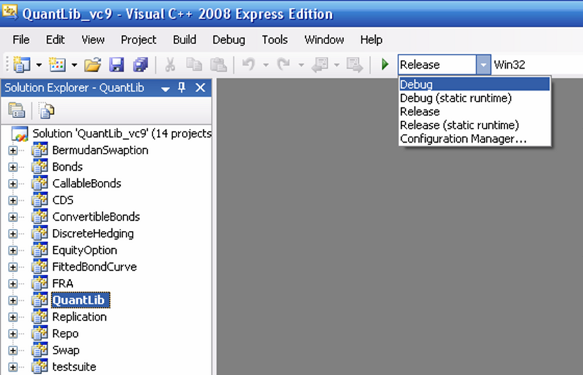
Enter the folder and open the Visual Studio solution called QuantLib_vc9.sln by double clicking (use the solution ending in _vc8 or _vc7 if you're using an earlier IDE.) As shown in the figure, choose Release from the configuration menu in the toolbar.
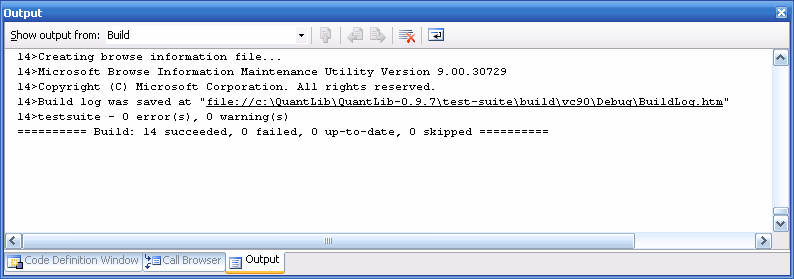
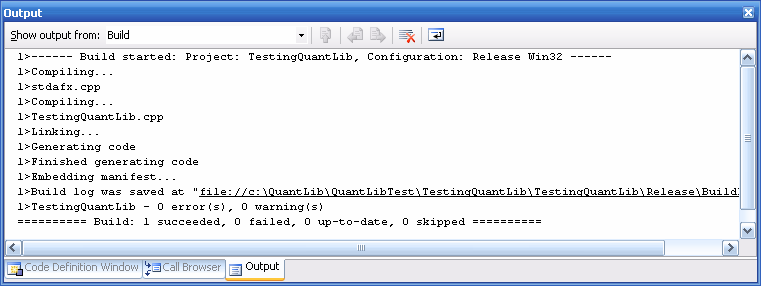
Right-click on the solution icon and choose Build Solution to build all projects. Besides QuantLib, this will build the examples and run the test suite. The building process takes a while.

After finishing, the output should show no errors.
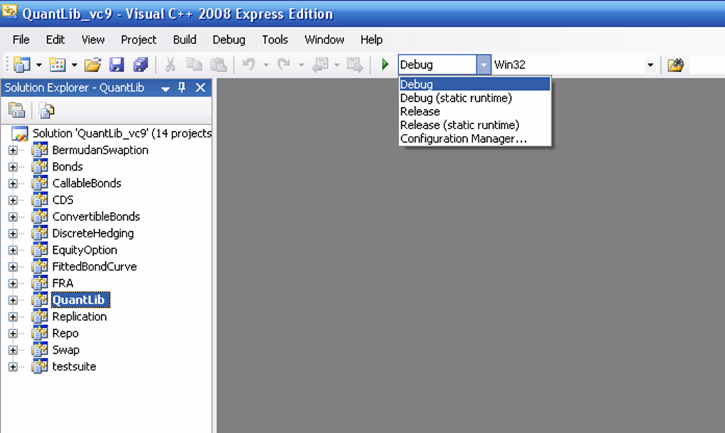
You are done with building QuantLib. If you want, you can build the Debug version in the same way by choosing Debug from the configuration menu as shown below. This will allow you to debug your application later.
Quantlib Usage
As an example of QuantLib usage, I create a QuantLibTest folder in the C:\QuantLib folder and set up a Win32 Console Application in Visual Studio by clicking File/New Project/Visual C++/Win32 Console Application.
I've chosen the project name TestingQuantLib. Choose, for example, the Release mode for that project. Note that very often, users don't setup a project correctly since they build QuantLib in one mode and try to call it from a test programm which runs in some other mode. If you build in QuantLib in release mode, you should build your project in release mode. If you build your project in debug mode without ever building QuantLib in debug mode, you'll have link errors.
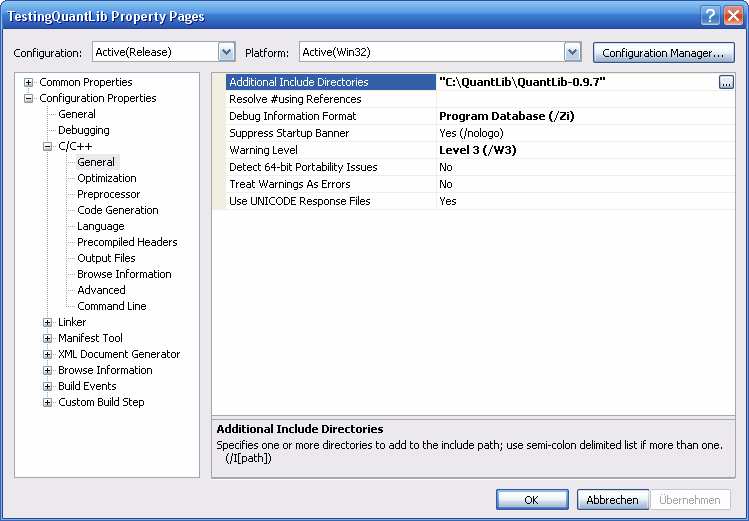
To tell your project where to find QuantLib, open the project properties, go to Configuration Properties/C/C++/General/Additional Include Directories and enter the QuantLib path, which is C:\QuantLib\QuantLib-0.9.7.
You don't need to do anything here regarding Boost, since you have added its paths to the general options before.
The result should be as shown below.
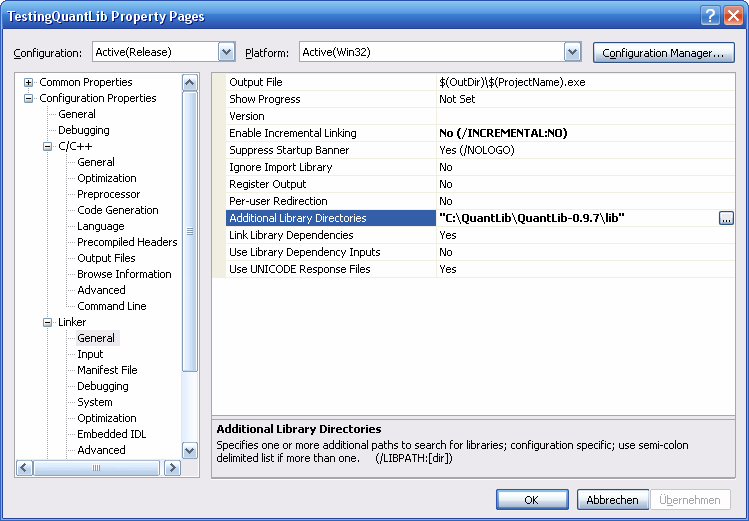
Finally, go to Configuration Properties/Linker/General/Additional Library Directories and add C:\QuantLib\QuantLib-0.9.7\lib (see figure below.) Click OK.
To test if the setup works, input the following main program in the TestingQuantLib project. The program tests some Date and Calendar classes.
// TestingQuantLib.cpp : Defines the entry point for the console application.
//

#include "stdafx.h"

#include <ql/quantlib.hpp>
#include <iostream>


int _tmain(int argc, _TCHAR* argv[])
{
        QuantLib::Calendar myCal=QuantLib::UnitedKingdom();
        QuantLib::Date newYearsEve(31,QuantLib::Dec,2008);

        std::cout << "Name: "                       << myCal.name()<< std::endl;
        std::cout << "New Year is Holiday: "        << myCal.isHoliday(newYearsEve)<< std::endl;
        std::cout << "New Year is Business Day: "   << myCal.isBusinessDay(newYearsEve)<< std::endl;

        std::cout << "--------------- Date Counter --------------------" << std::endl;

        QuantLib::Date date1(28,QuantLib::Dec,2008);
        QuantLib::Date date2(04,QuantLib::Jan,2009);

        std::cout << "First Date: "            << date1 << std::endl;
        std::cout << "Second Date: "           << date2 << std::endl;
        std::cout << "Business Days Betweeen: "<< myCal.businessDaysBetween(date1,date2) << std::endl;
        std::cout << "End of Month 1. Date: "  << myCal.endOfMonth(date1) << std::endl;
        std::cout << "End of Month 2. Date: "  << myCal.endOfMonth(date2) << std::endl;

        return 0;
}
The output of the program should be:
Name: UK settlement
New Year is Holiday: 0
New Year is Business Day: 1
--------------- Date Counter --------------------
First Date: December 28th, 2008
Second Date: January 4th, 2009
Business Days Betweeen: 4
End of Month 1. Date: December 31st, 2008
End of Month 2. Date: January 30th, 2009
A last thing: If you see some warnings after building, to get rid of them open the project properties again, go to Configuration Properties/C/C++/Preprocessor/Preprocessor Definitions and add _SCL_SECURE_NO_DEPRECATE and _CRT_SECURE_NO_DEPRECATE to the definitions, as shown below.

Now, building the TestingQuantLib project again shouldn't show you any warnings anymore, just as in the Output below. We're done!
Appendix: Manual Boost Installation
To build Boost manually, download the zip archive of the latest Boost release from http://sourceforge.net/projects/boost/files/boost/.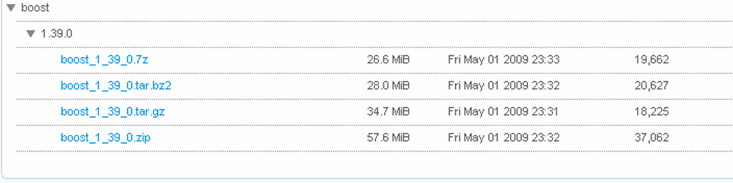
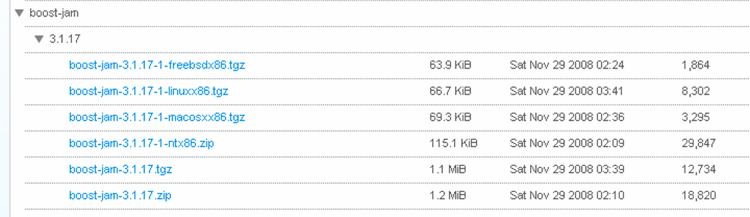
In addition, download the latest Boost Jam from http://sourceforge.net/projects/boost/files/boost-jam/.
Unzip the Boost zip archive in the folder C:\Boost. You will then have a directory called C:\Boost\boost_1_39_0 (depending on the version of the latest release.)
Unzip the Boost Jam zip archive in the folder C:\Boost. You will then have a directory called C:\Boost\boost-jam-3.1.17-1-ntx86. Go into this directory and copy the file called bjam.exe. Go back to C:\Boost\boost_1_39_0 and paste bjam.exe.
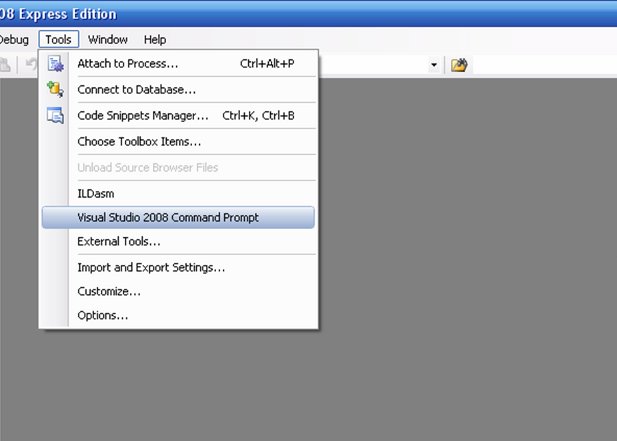
Now, open Visual Studio without any project and go to Tools/Visual Studio 2008 Command Prompt in the upper menu.
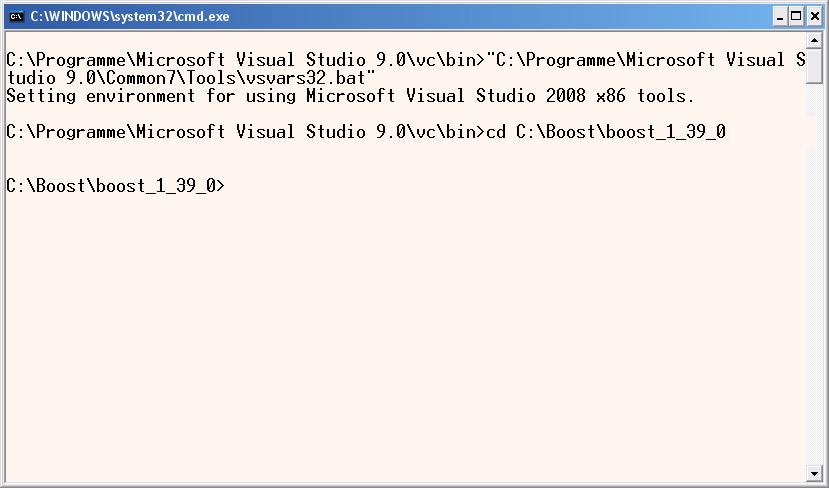
This will open a window. In the window, paste
cd C:\Boost\boost_1_39_0
to change the directory to your Boost folder (if you're not building release 1.39, modify the above accordingly.) The result should look similar to the window shown below.
Now start bjam by pasting
bjam --build-type=complete --toolset=msvc install
into the DOS window. Press enter. Depending on the daytime of your installation, get a tea or a drink, as the above command will take a few hours to finish.
After the compilation, setup your IDE to use Boost as described in the Boost configuration section above.
Appendix: Boost Usage
To check that Boost was successfully installed, set up a Win32 Console Application in Visual Studio by clicking File/New Project/Visual C++/Win32 Console Application.
I created the project in a folder called BoostTest in the C:\Boost folder. The project name is TestingBoost. Since you should have included the Boost directories in the global IDE option, no further configuration should be necessary.
Paste the following test program in the file with the main function, in our case TestingBoost.cpp. The program shows Boost's FOR_EACH functionality.
// TestingBoost.cpp : Defines the entry point for the console application.
//

#include "stdafx.h"

#include <vector>
#include <iostream>

#include <boost/foreach.hpp>

int _tmain(int argc, _TCHAR* argv[])
{
        std::vector<double> myVec(5);

        myVec[0]=0.0;
        myVec[1]=0.1;
        myVec[2]=0.2;
        myVec[3]=0.3;
        myVec[4]=0.4;

        std::cout << "--- Vector For Each ---" << std::endl;
        BOOST_FOREACH(double x, myVec){
                std::cout << x << std::endl;
        }

        return 0;
}
The output of the program should be
--- Vector For Each ---
0
0.1
0.2
0.3
0.4